Amazon S3
Set Amazon S3 access policy to minimum permission
As we said, it’s quite easy to do this. You just have to connect to your AWS Console and create a group. After that, specify a policy for the group and add a user to the group. Below are the detailed steps you have to make:
-
Log into AWS Console
In order to log into your AWS Console just go to the following link https://console.aws.amazon.com/console/home and log in with your e-mail and password.
If you do not have a user just select “I am a new user” which will take you through all the steps of creating a new user.
After logging in, you will see the navigation bar which will have a few menu items on it, at the top of your page. Looking at the right side, click your name and then go to the menu called “Security Credentials.”
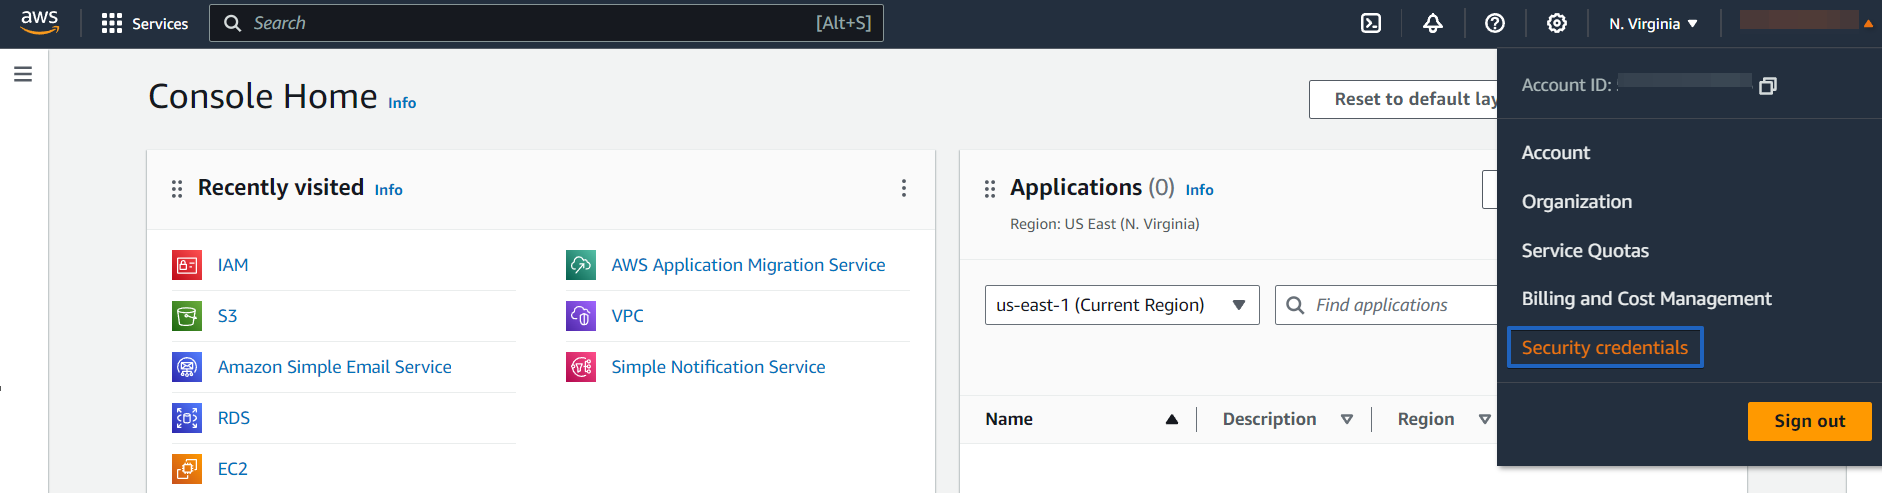
You might get a pop-up message saying that “You are accessing the configuration page for your root account credentials.” Click “Get Started with IAM Users” in order to set up your security credentials.
On the other side of the page, on the left side, you will see a few items: “Groups,” “Users,” “Roles,” and “Password Policy.” Let’s start by creating a group with a security policy.
-
Create a security policy
To create a policy, click on the “Policies” at the left pan and create a new policy by clicking the “Create policy” button.
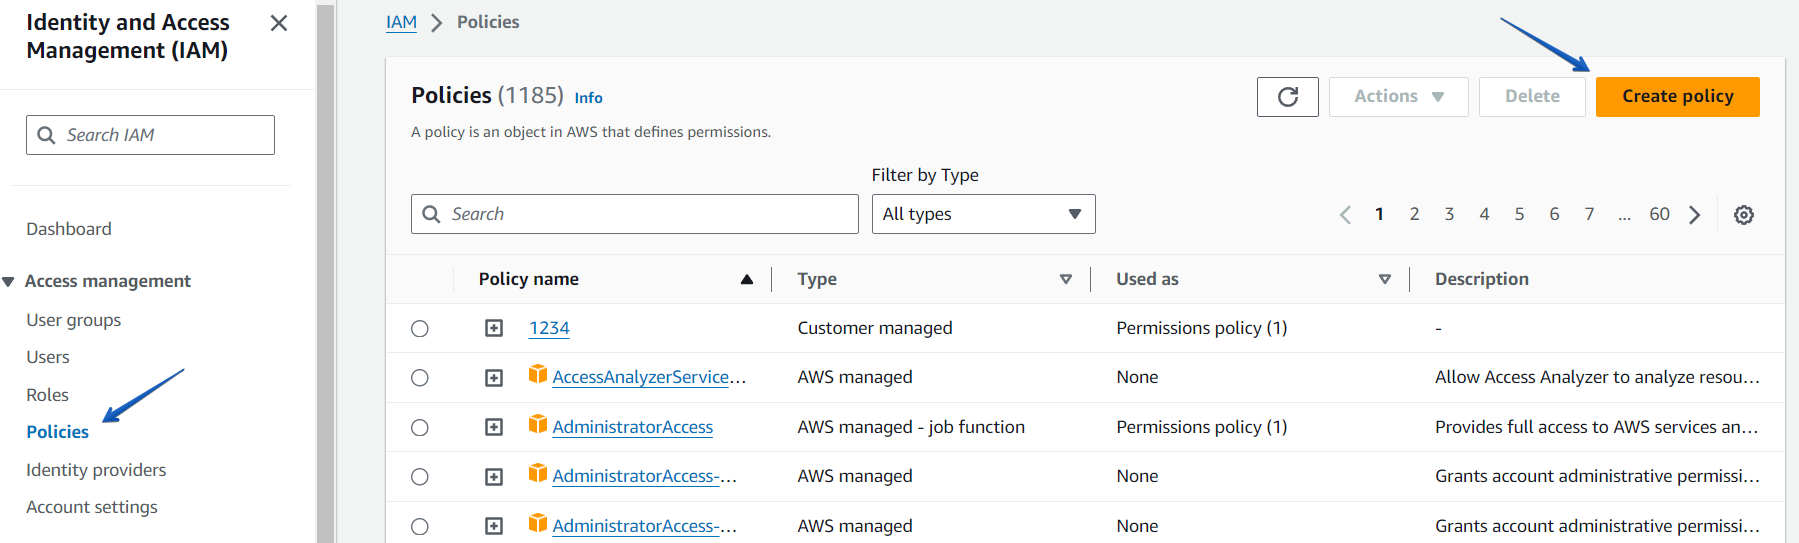
At this point, we can enter a policy name and manually specify its characteristics. You can find a good user guide here. But, we’re aiming for a specific situation, so we can use this policy document:
{
  "Version": "2012-10-17",
  "Statement": [
  {
    "Sid": "VisualEditor1",
    "Effect": "Allow",
    "Action": [
      "s3:PutObject",
      "s3:GetObject",
      "s3:GetObjectVersion",
      "s3:DeleteObject",
      "s3:AbortMultipartUpload",
      "s3:ListBucketMultipartUploads",
      "s3:ListMultipartUploadParts",
      "s3:ListBucket",
      "s3:GetBucketVersioning",
      "s3:GetBucketLocation"
    ],
    "Resource": [
      "arn:aws:s3:::test-s3-bucket-for-policy/*",
      "arn:aws:s3:::test-s3-bucket-for-policy"
    ]
  },
  {
    "Sid": "VisualEditor2",
    "Effect": "Allow",
    "Action": [
      "s3:ListAllMyBuckets",
      "s3:ListBucket"
    ],
     "Resource": "*"
   }
 ]
}
Copy the policy above and paste it into the appropriate section, then click on the “Next” button.
Please note that in the policy, we have specified a bucket to which access will be provided as test-s3-bucket-for-policy. You can either change your bucket name in the policy or simply use ‘*’ instead of your bucket name.
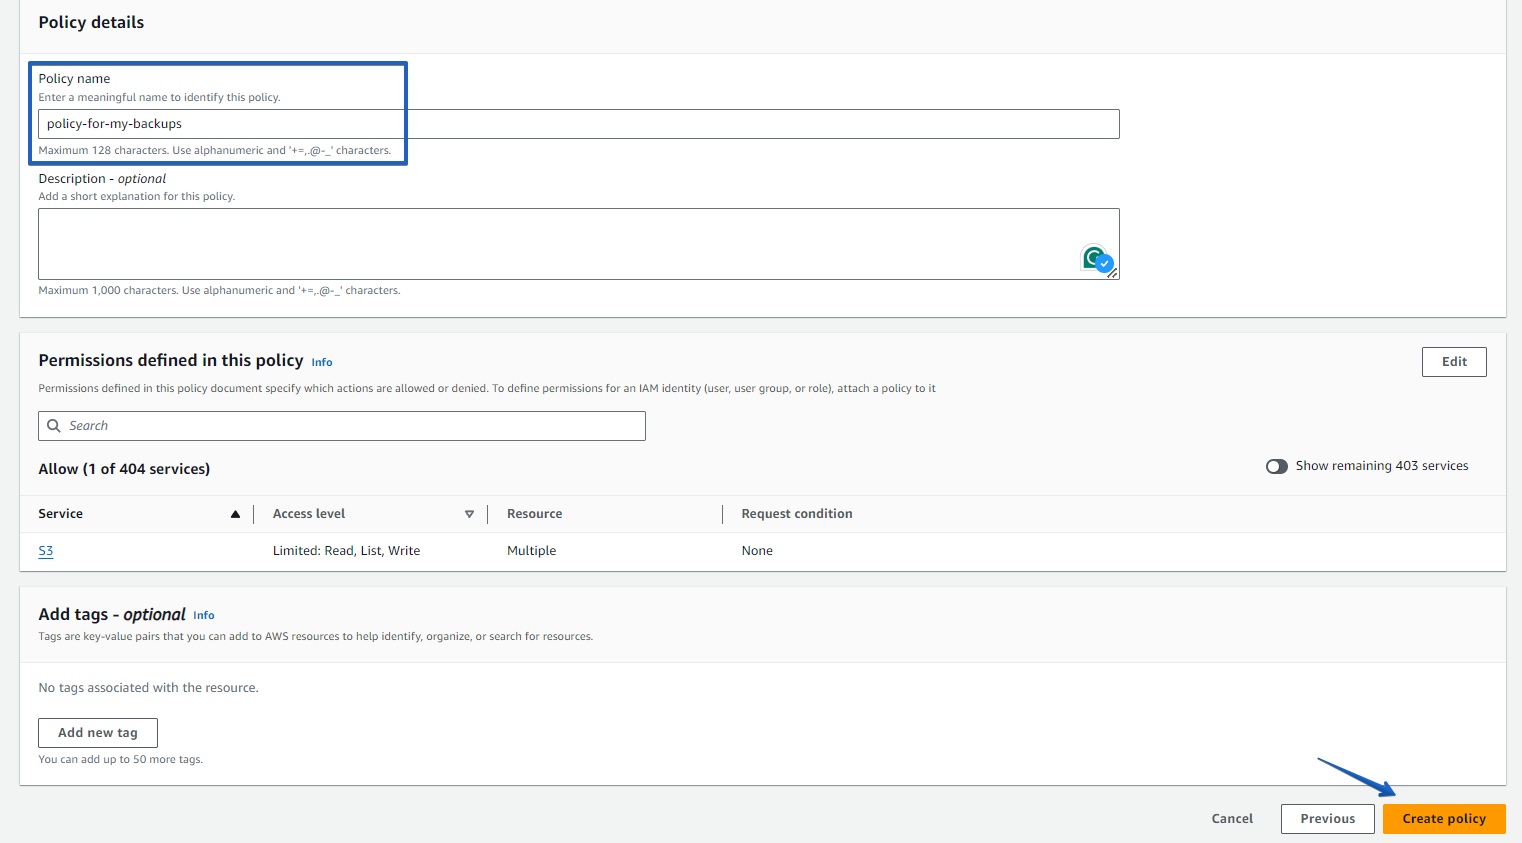
Specify your policy name and click on the “Create policy” button at the bottom of the page.
-
Create a User
In order to create a new user, select “Users” which you can find on the left side of the AWS Console, and then choose “Create Users.”
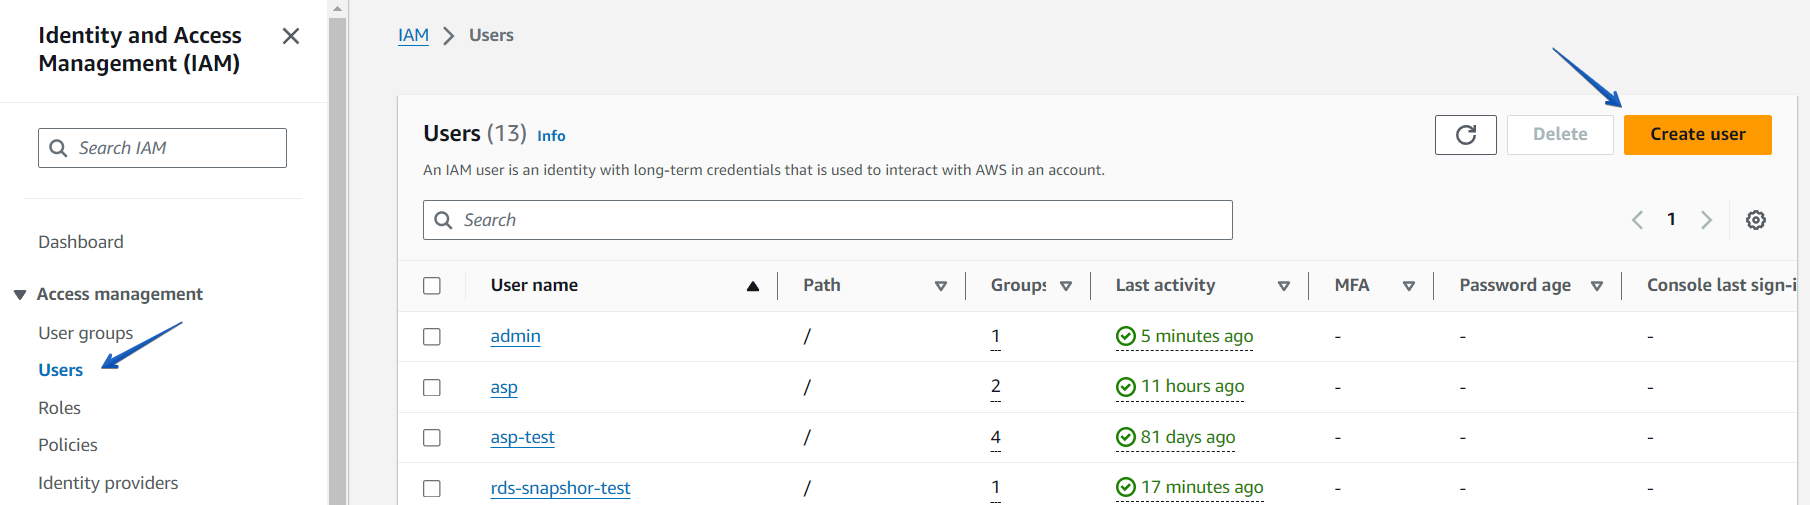
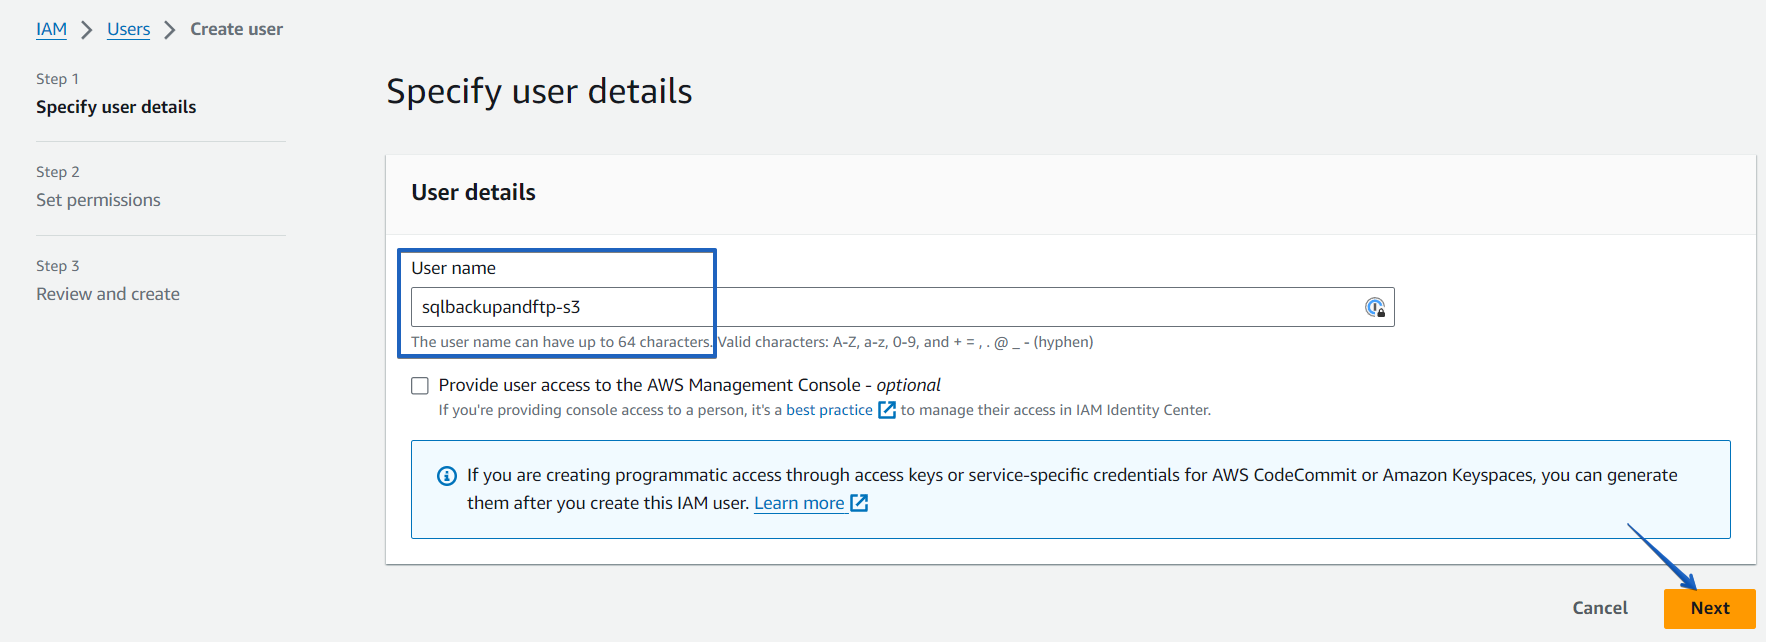
A new window will open with 3 simple steps to create a user.Step 1. Enter the username. Let’s assume it’s sqlbackupandftp-s3.
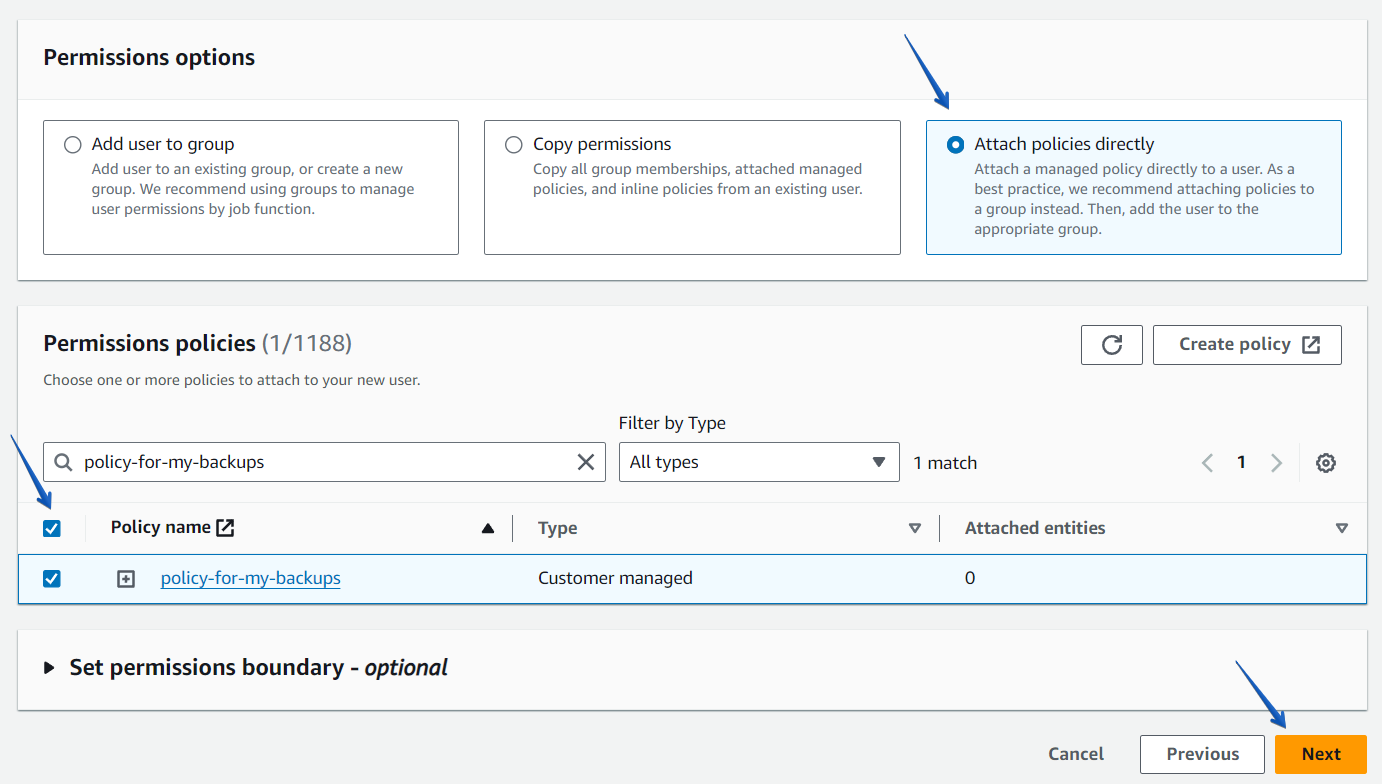
Step 2. Click on the “Attach policies directly” tab and choose the policy that was created earlier.
 Step 3. Add tags (optional) and complete the user creation.
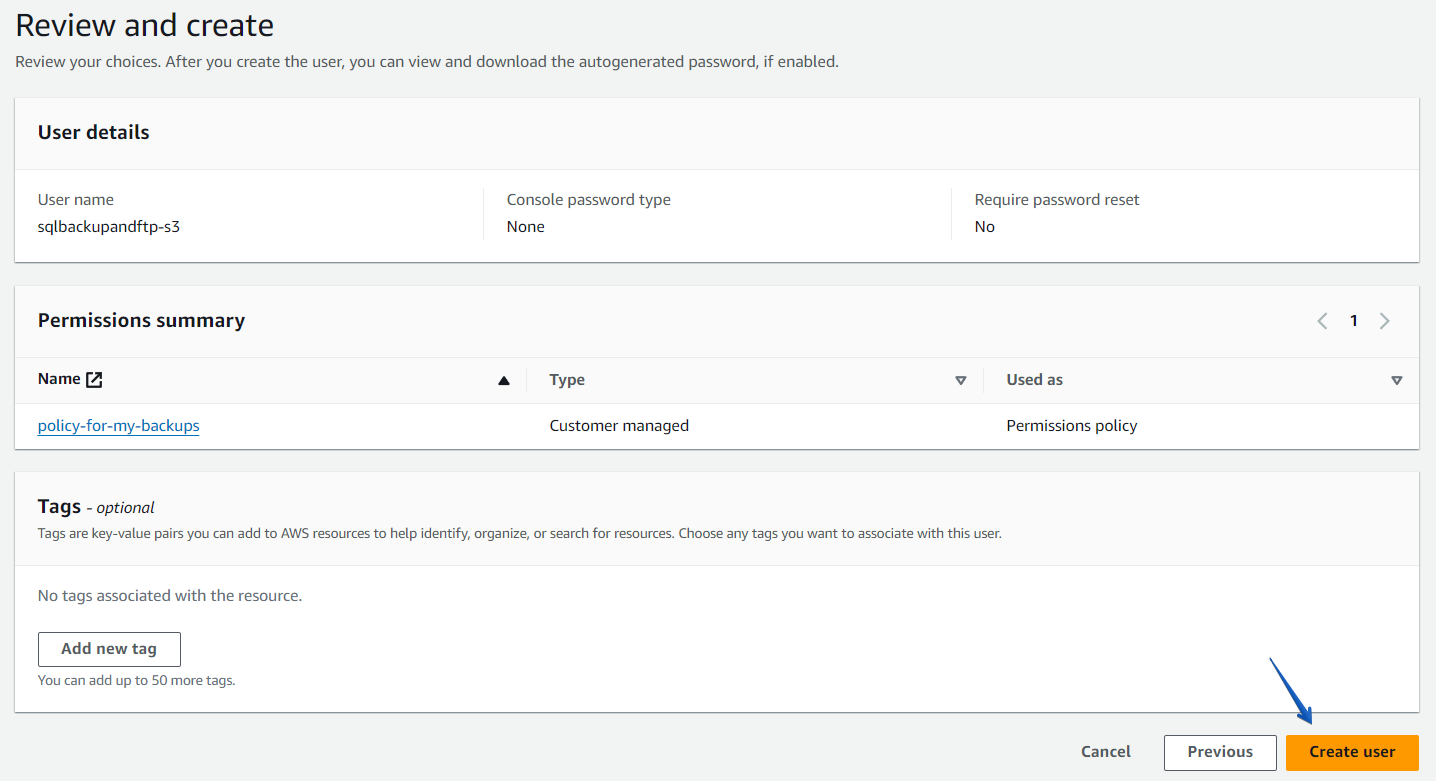
The policy is successfully set to the user. Now you can use an Accesskey ID and a secret access key to connect SQLBackupAndFTP to your Amazon S3. -
Create access key
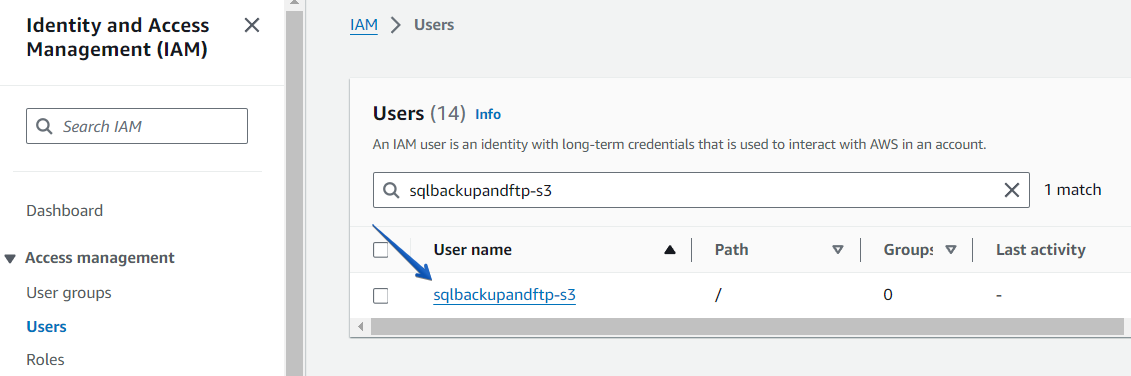
On the Users page, find the user that has been created.
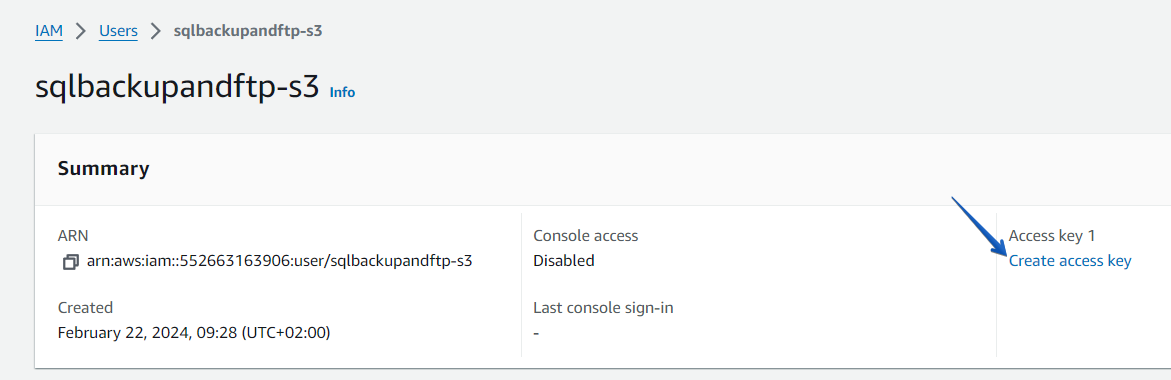
At the opened page click on the “Create access key” link.
Choose “Other” from the “Use Case” list and click on the “Next” button.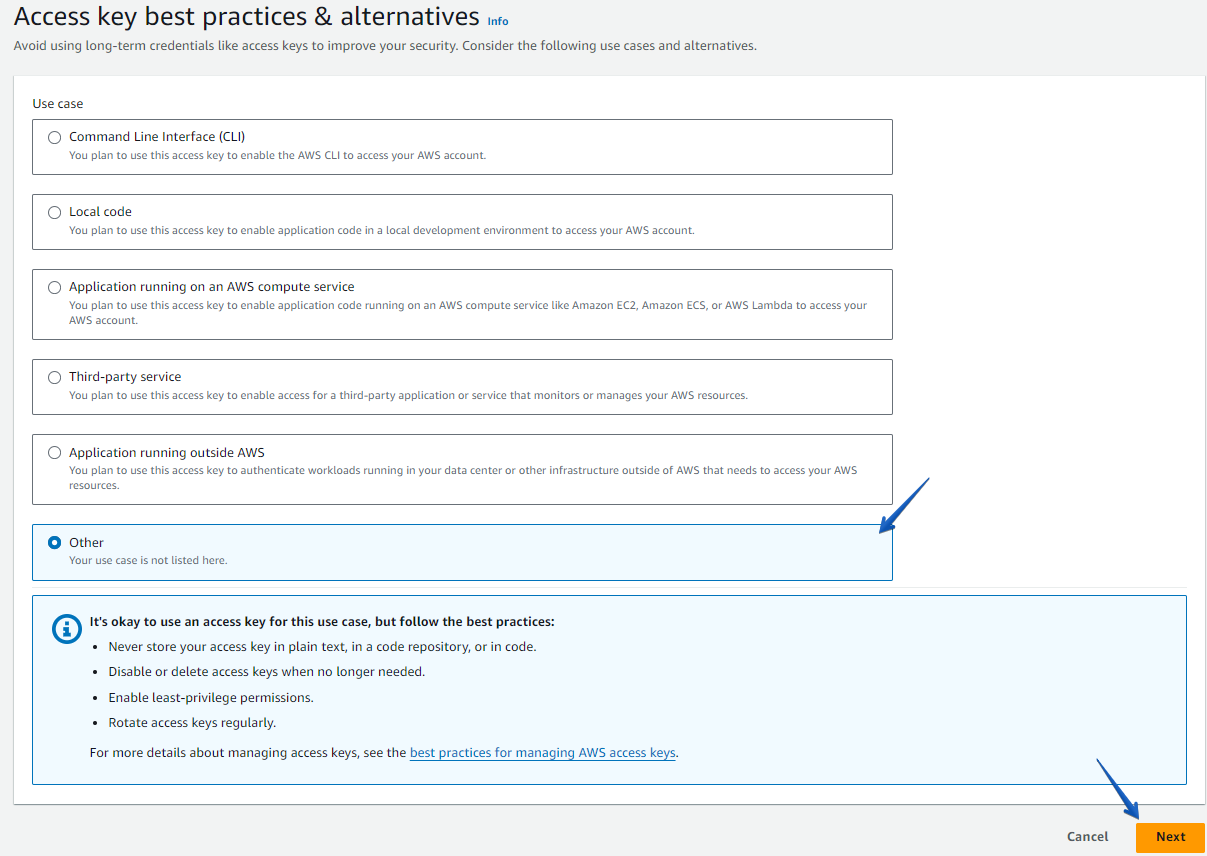
If necessary, add a description tag value and click on the “Create access key” button.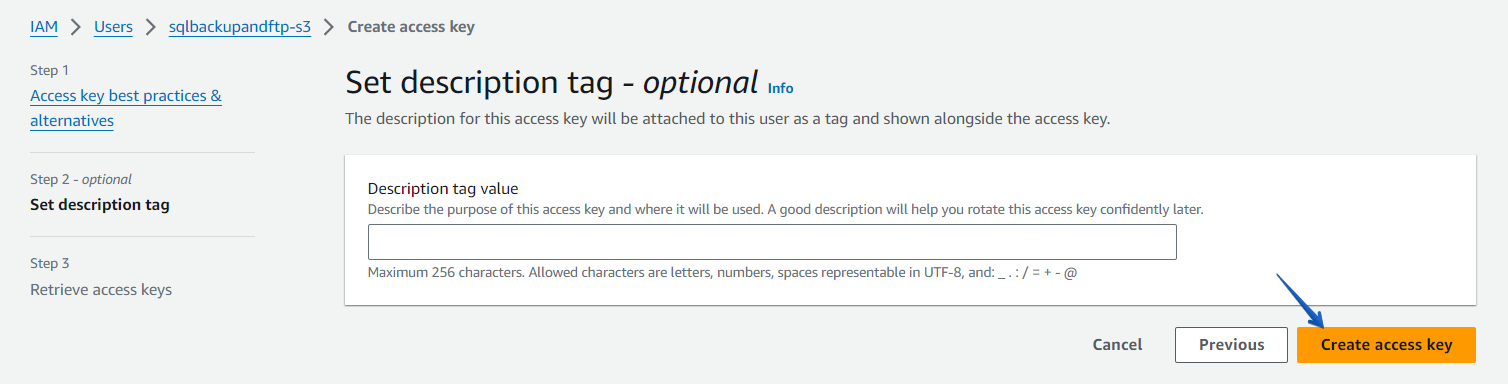
That’s it, the access key and secret access key are created. Click on the “Done” button to complete the settings.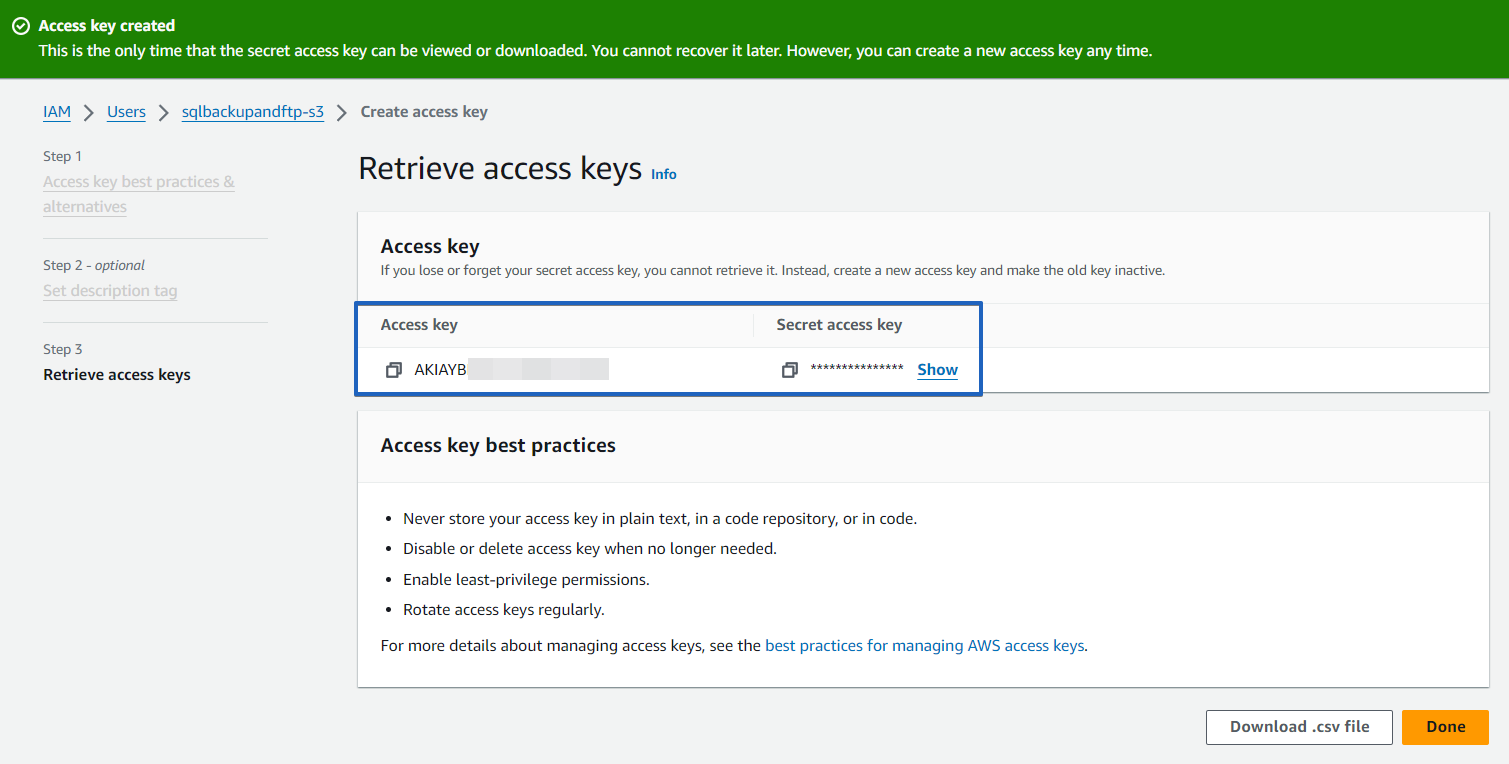


Adding Amazon S3 as a backup destination
To send backups to Amazon S3 storage, you first need to set up a destination in the “Storages” page:
1. Go to the “Storages” page and click “Add Storage” and select Amazon S3 as the storage destination:
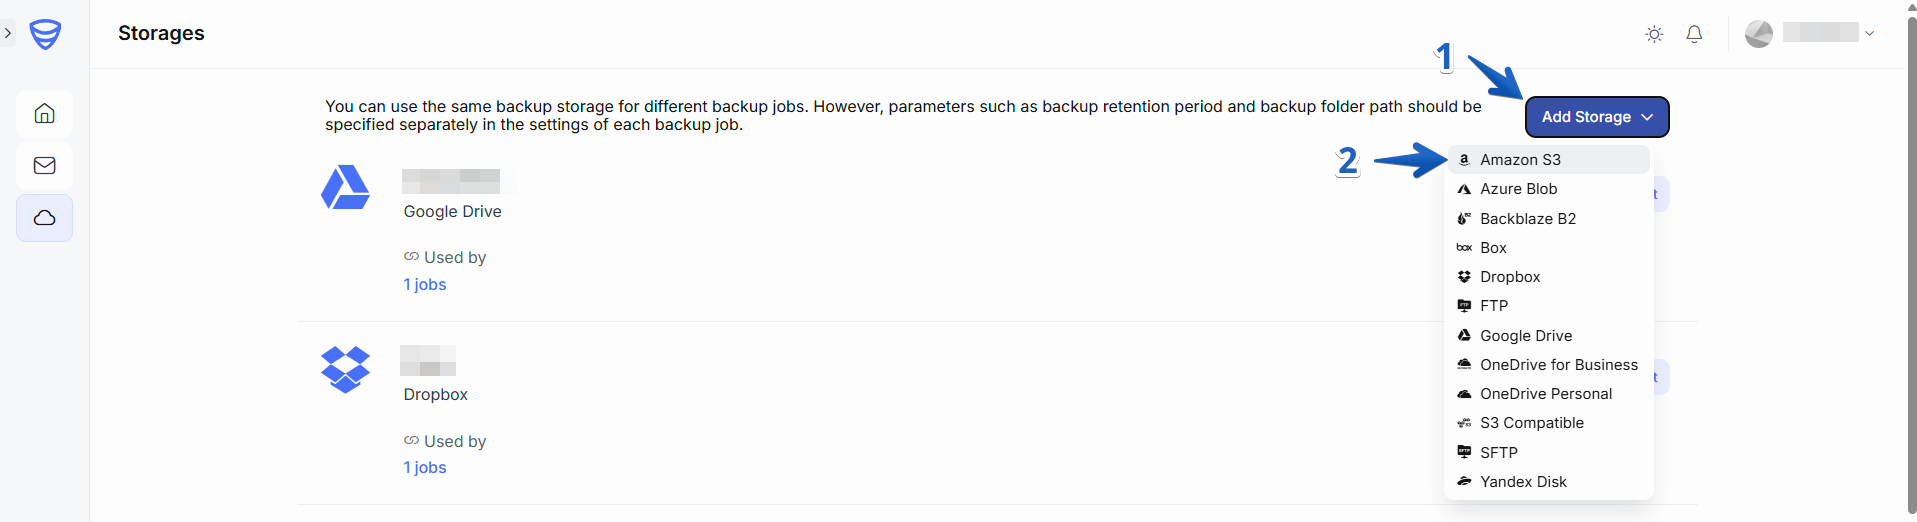
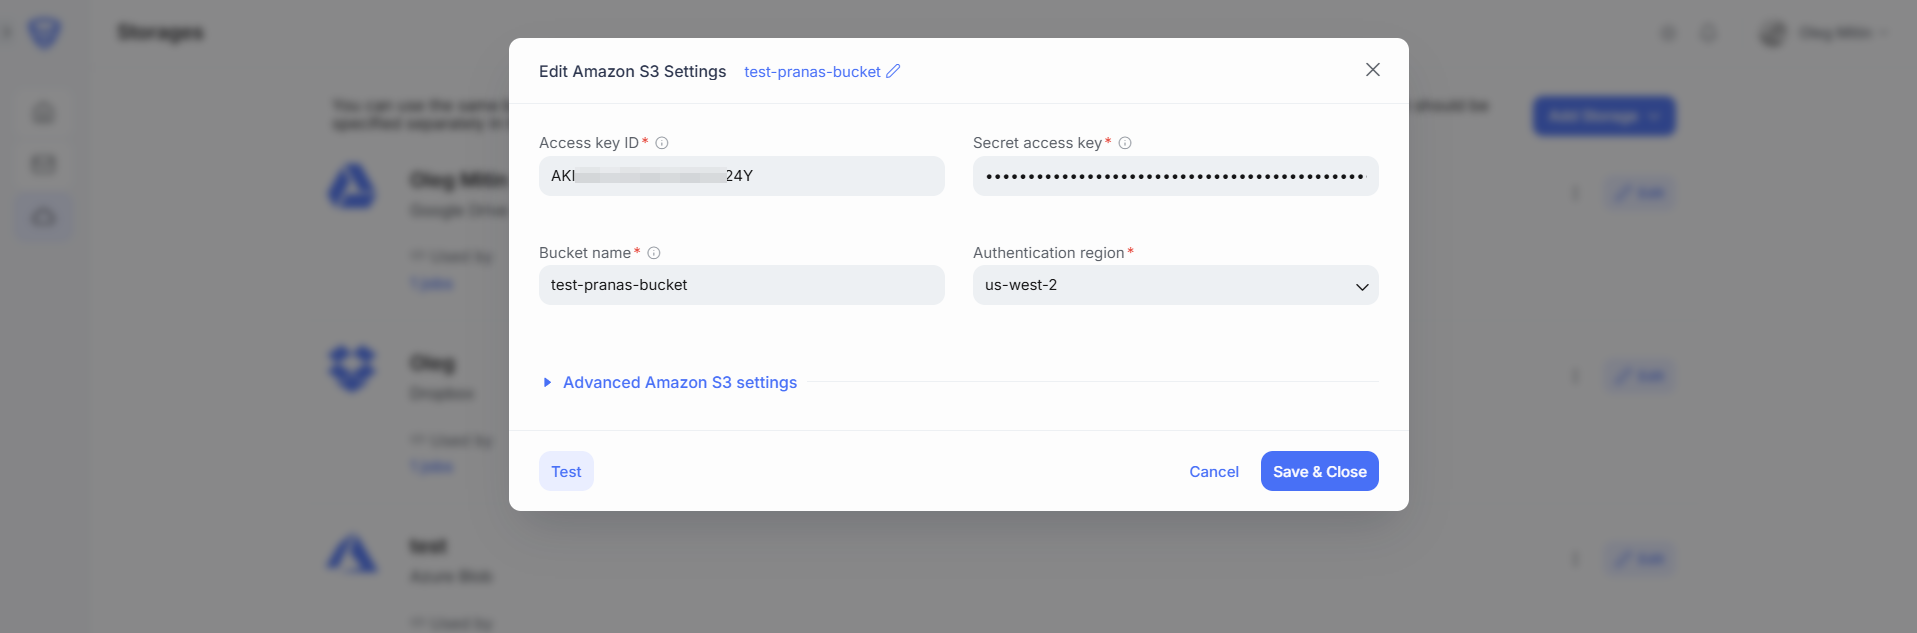
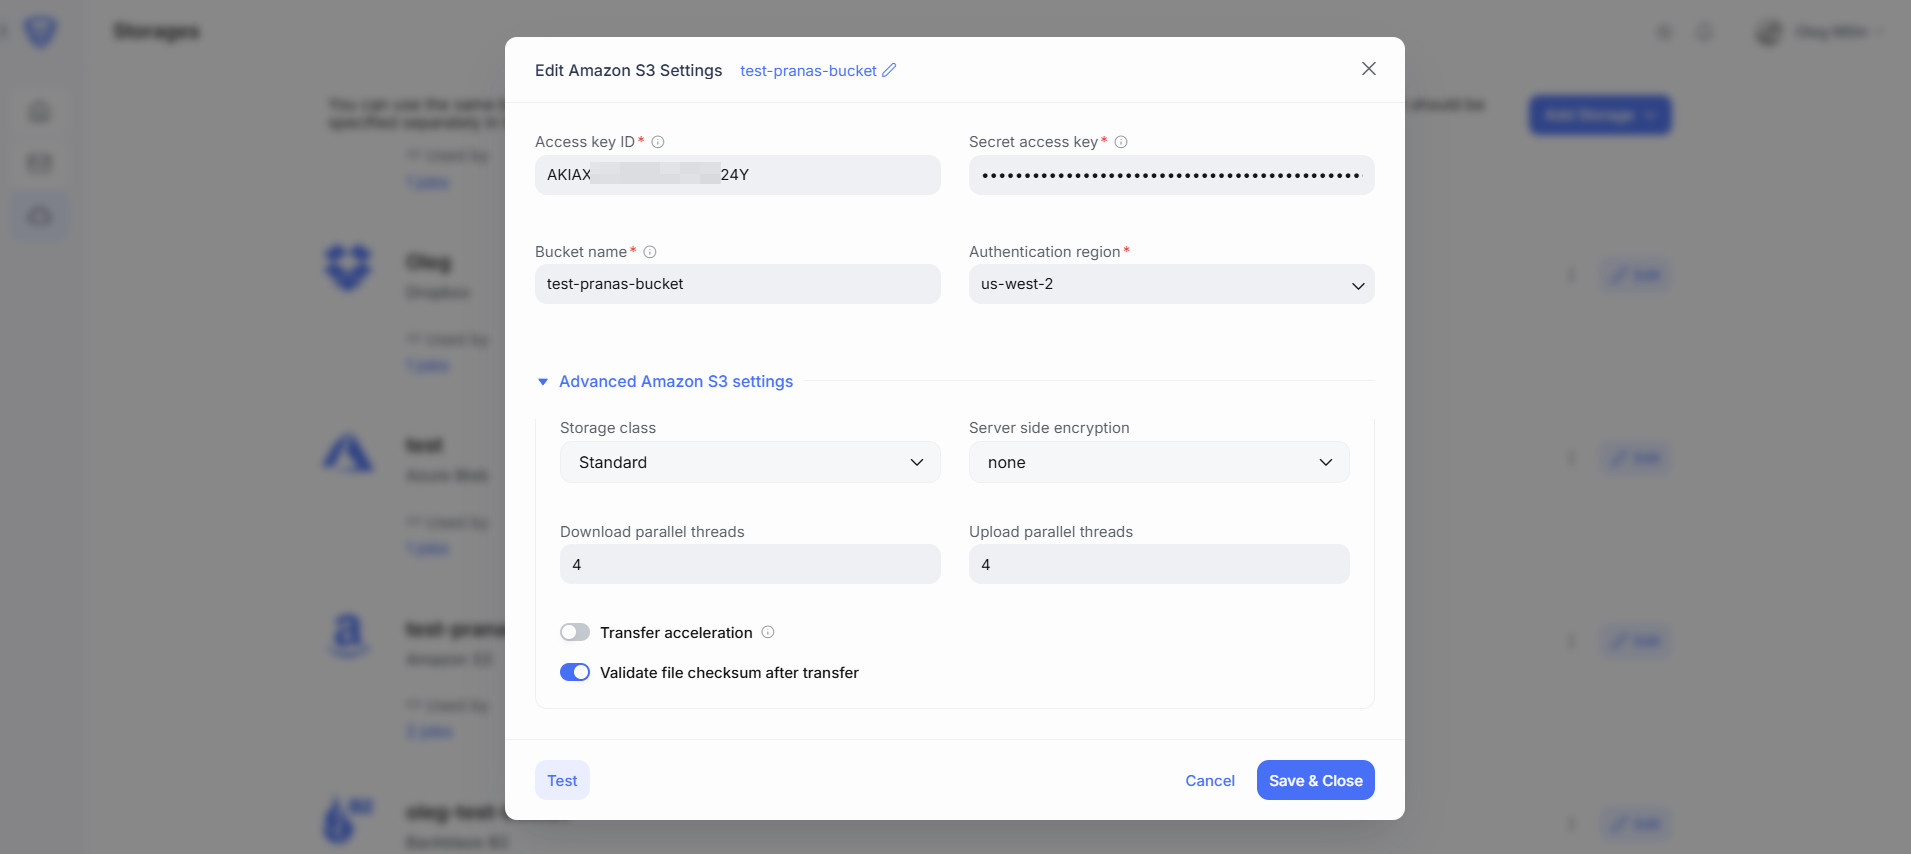
2. In the “New Amazon S3 Settings” pop-up window, enter the following credentials:
-
-
Access Key ID – Found on the “Security Credentials” page of your AWS account.
-
Secret Access Key – You can create a new one in the “Security Credentials” section of your AWS account by clicking “Create Access Key”.
-
Bucket Name – This is the S3 bucket where your backups will be stored. You need to create this bucket in your AWS Console before configuring it in the app.
-
Authentication Region – Specify the correct AWS region where your bucket is located (e.g.,
us-east-1,eu-central-1, etc.). You can find the region in the bucket’s settings within the AWS Console. The region must exactly match the bucket’s actual location — otherwise, authentication will fail.
-
Once configured, click “Test” to verify the connection. If successful, click “Save & Close” to apply your settings.
These are the basic settings required to configure Amazon S3 as a backup destination.
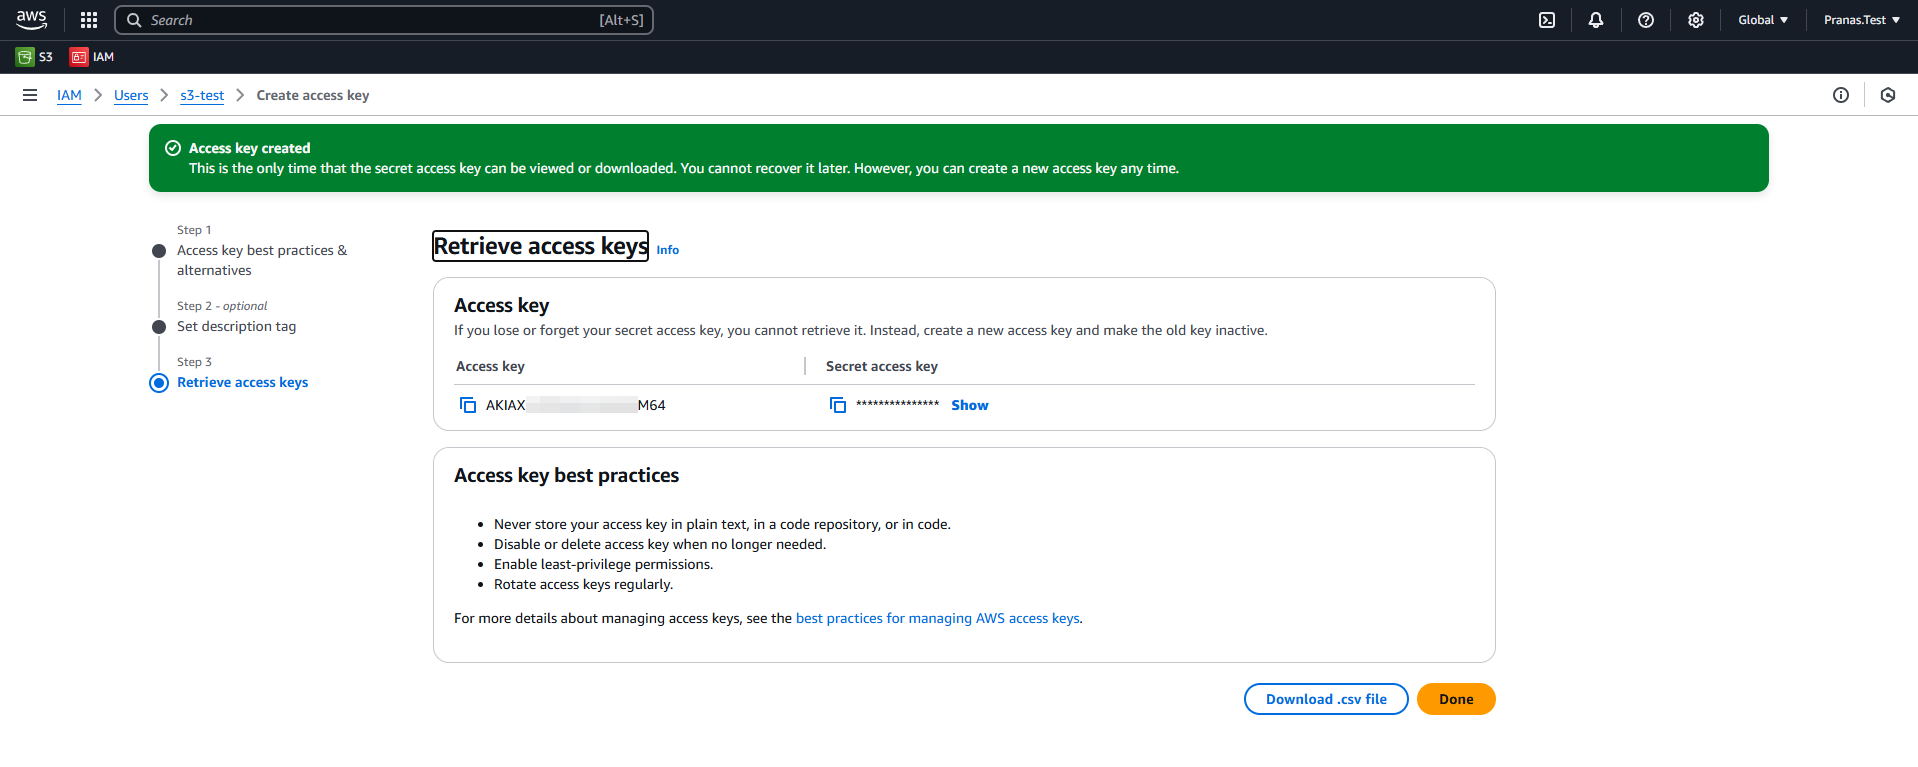
The Secret Access Key to your Amazon S3 storage cannot be retrieved from Amazon once it has been created. If you did not store it when it was first generated, you will need to create a new Access Key.
To create a new Access Key (Access Key ID and Secret Access Key):
-
Log in to your AWS Management Console.
-
Navigate to IAM (Identity and Access Management).
-
In the left-hand menu, click Users.
-
Select the appropriate user from the list (or create a new one if needed).
-
Go to the Security Credentials tab.
-
Click Create Access Key.
⚠️ Note: After the key is created, be sure to copy and securely store the Secret Access Key — it cannot be viewed again once you leave the page.
Advanced Amazon S3 Settings (Optional)
You can further customize your backup storage with the following options:
-
Storage Class – Choose different S3 storage classes (e.g. Standard, Standard Infrequent Access, One Zone Infrequent Access, Reduced Redundancy). 🔗
-
Server-Side Encryption – Encrypt your backups for additional security (e.g. AES 256, AWS Key Managment Service). 🔗
-
Parallel Upload/Download Threads – This setting controls how many simultaneous threads SqlBak uses for uploading or downloading backups to/from storage. Increasing the number of threads can speed up the transfer, especially over high-bandwidth connections.
⚠️Note: more threads also increase the load on your network, CPU, and disk. Use this option to optimize performance based on your system’s capabilities. In some cases, you may also reduce the number of threads to limit resource usage or avoid saturating the network.
-
Transfer Acceleration – Enable S3 Accelerate for faster uploads. Note that this option must be enabled both in SqlBak and in your AWS bucket settings.
To enable it in AWS, go to your bucket’s Properties tab in the AWS Console, find Transfer Acceleration section, click Edit, enable it, and save the changes. 🔗
-
Validate File Checksum – Ensures data integrity after transfer by verifying that the uploaded file matches the original. More details here: 🔗 Validate File Checksum
Steps to add Amazon S3 storage to a backup job
After configuring Amazon S3 destination settings, you can use this destination in backup job:
- Return to the Dashboard page.
- Open the backup job you want to modify (or create a new one), and click the “Edit” button.
-
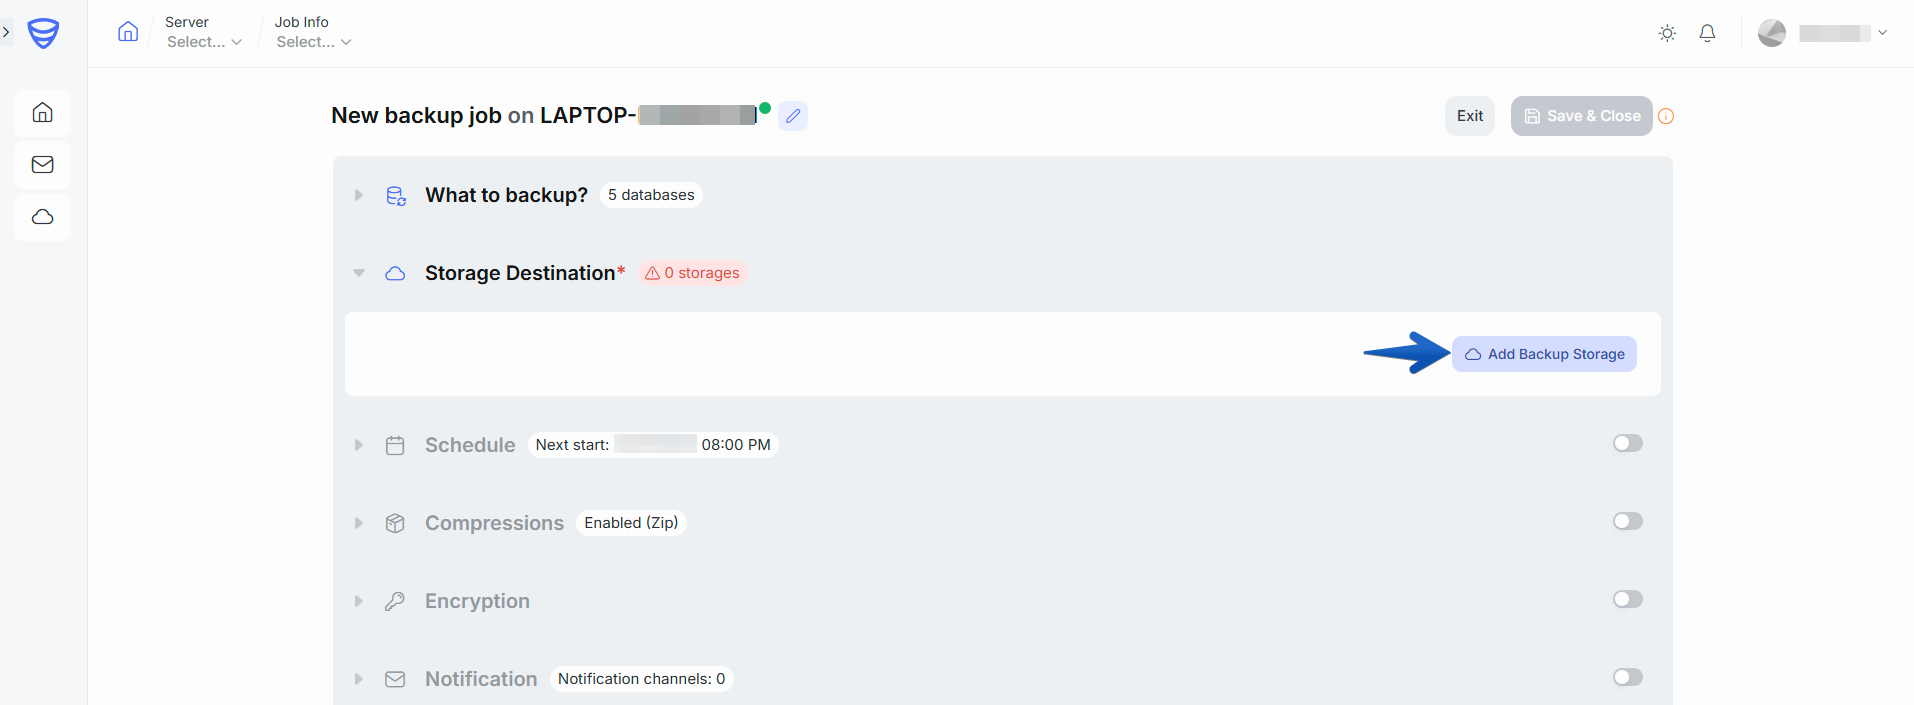
Navigate to the Storage Destination section.
-
Click “Add Backup Storage”.
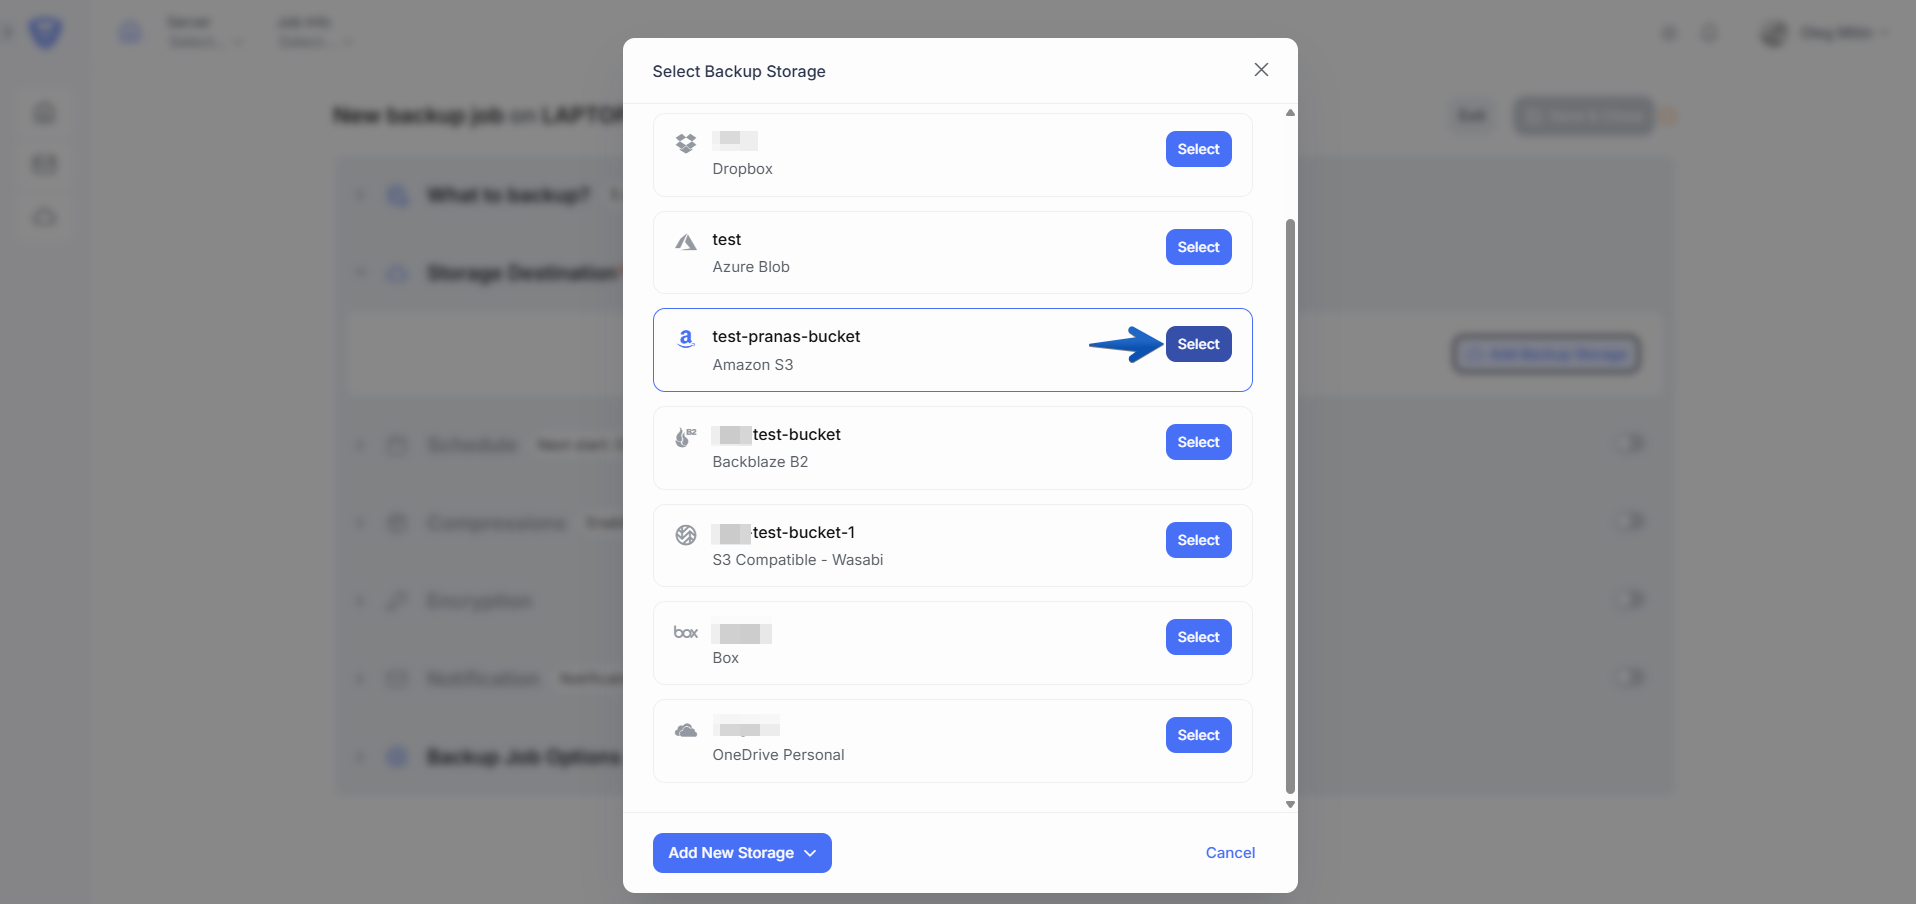
5. Select Amazon S3 storage destination:
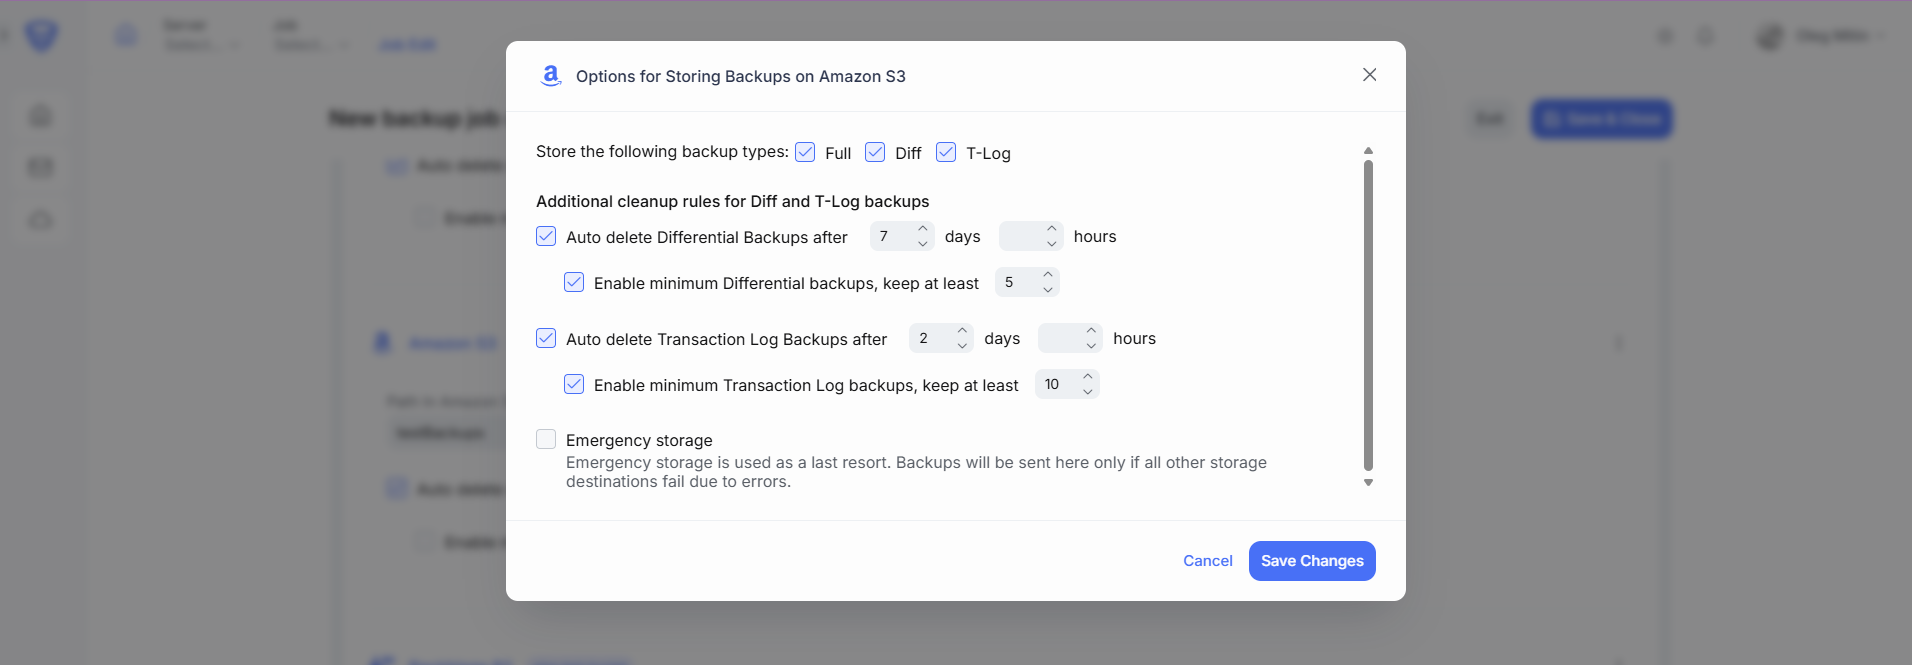
6. In the configuration window, specify the following:
-
-
Autodelete old backups after – Define a retention period for automatically deleting old backups.
-
Enable minimum backups – Set the minimum number of backups to retain, even if they exceed the defined retention period.
-
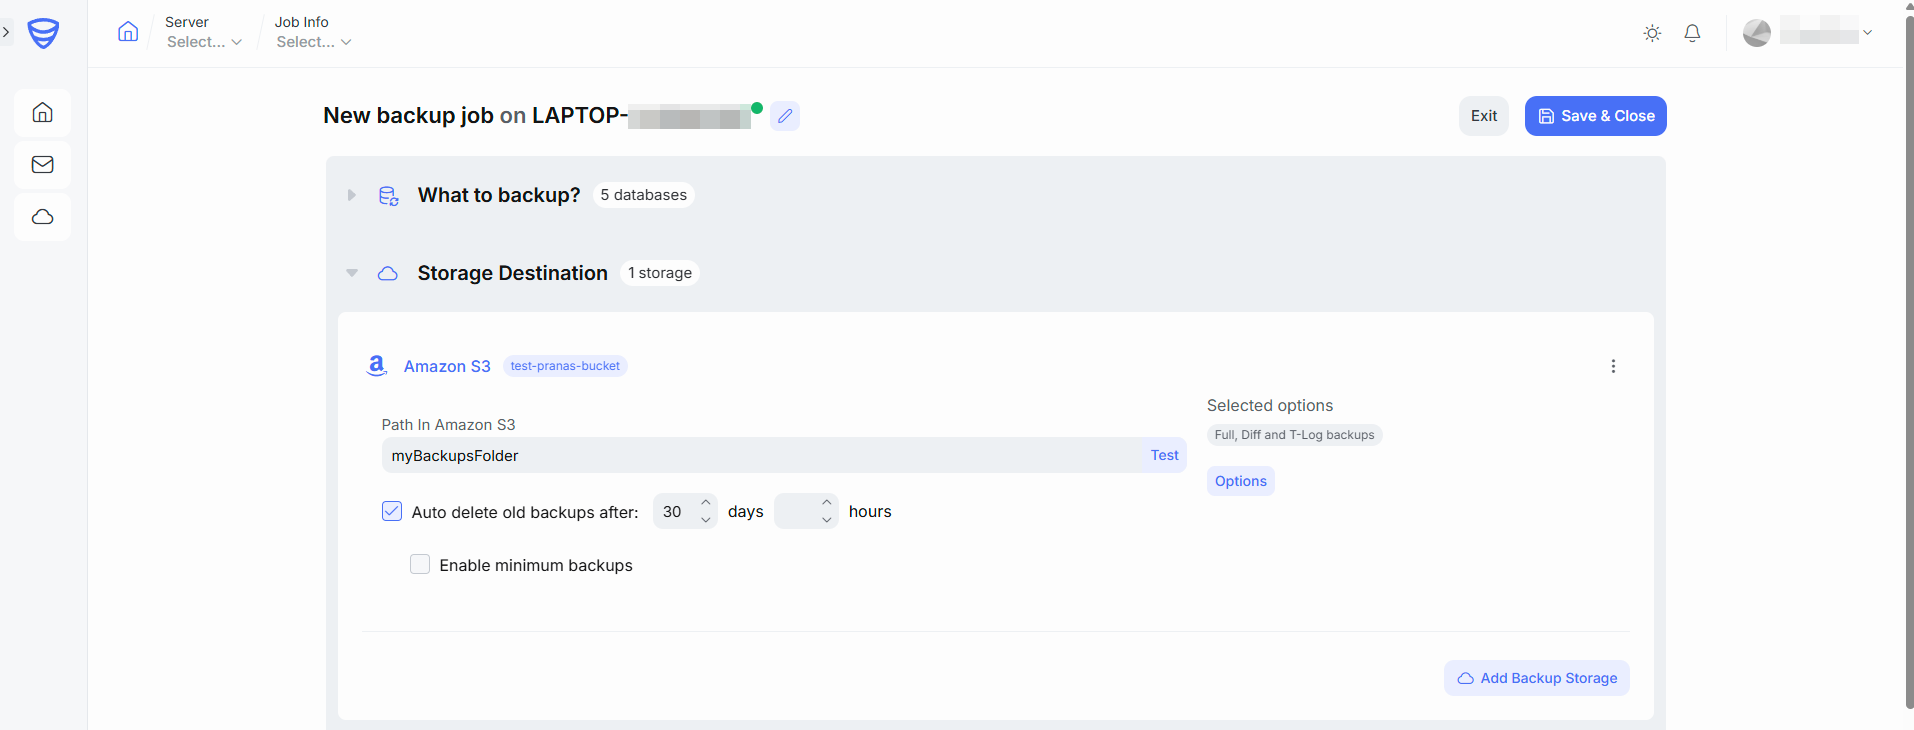
Optional settings:
-
Store the following backup types (Full, Diff, T-Log) – Choose which backup types to store in this destination.
-
Auto delete Differential Backups after – Define a retention period specifically for differential backups.
-
Auto delete T-Log Backups after – Define a retention period specifically for transaction log backups.
-
Enable minimum Differential or T-Log backups – Set the minimum number of differential or T-Log backups to keep, even if older than the retention limit.
-
Emergency storage – Use this option to designate Amazon S3 as an emergency/failover destination in case the primary backup storage becomes unavailable. More details here: 🔗 Use Emergency Storage