Microsoft SQL Server Connection
How to add SQL Server connection on Windows
For Microsoft SQL Server instances:
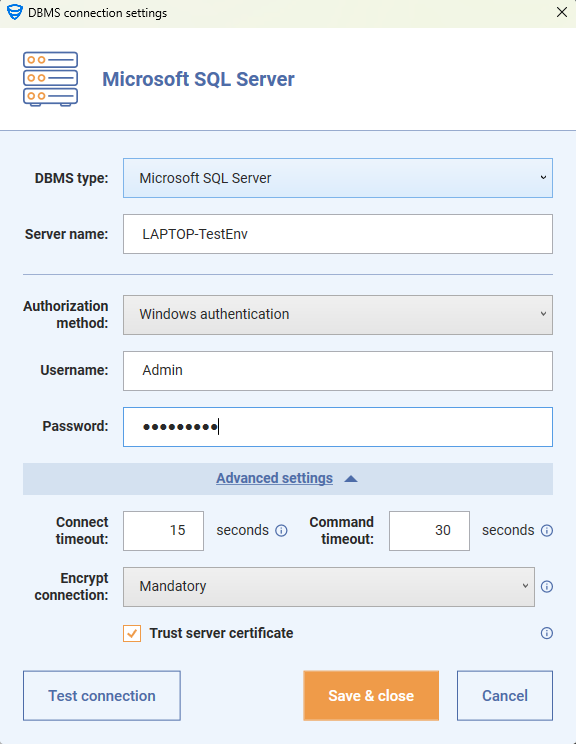
- Open SqlBak app and click “+Add” button to add new server connection.
- In the pop-up window, choose “Microsoft SQL Server” in the DBMS type dropdown.
- Enter the Server name. Note: the Server name you enter in SqlBak must match the one you use in SQL Server Management Studio (SSMS).
- Select the authentication method, Login and Password.
-
(Optional) Click Advanced Settings to configure:
-
Connect timeout – The time (in seconds) to wait for a connection to open.
This option defines how long SqlBak will wait when trying to establish a connection to the SQL Server before timing out. If your server is under heavy load or on a slow network, you may want to increase this value. -
Command timeout – The time (in seconds) to wait for a command to execute.
This setting controls how long SqlBak will wait for a SQL command to complete. If you’re working with large databases or slow operations, increasing this value can help prevent timeouts. -
Encrypt connection – Enables SSL/TLS encryption for the connection to SQL Server, if the server has a valid SSL certificate installed. In the dropdown, select Mandatory, Optional, or Strict (SQL Server 2022 and Azure SQL). Note: Use the same encryption setting as in SQL Server Management Studio (SSMS).
For more information about these options, please refer to the official Microsoft documentation: https://learn.microsoft.com/en-us/sql/database-engine/configure-windows/special-cases-for-encrypting-connections-sql-server?view=sql-server-ver16 -
Trust server certificate – Forces the application to trust the SQL Server’s SSL certificate without validating its authenticity.
Use this option if your server uses a self-signed or untrusted certificate and you want to bypass certificate validation. Note: This can pose a security risk and should only be used in trusted environments.
-
- Click “Test Connection” to verify access and “Save & Close” to save connection.
How to add a SQL Server connection on Linux
1. Open the terminal and run the following command:
sqlbak
2. In the interactive menu, select: 1. Manage backup source connections → 1. Add a backup source connection
Enter 1 to add a SQL Server connection.
3. Enter SQL Server parameters:
- SQL Server name:
Specify the server name or IP address.
Default value:.(local server) - Use Windows Authentication:
- Enter
Yto use Windows Authentication. - Enter
Nto provide SQL Server login and password.
- Enter
- User name:
Enter the SQL Server user name if SQL authentication is used. - Password:
Enter the user’s password. - Trust server certificate:
- Enter
Yto trust the server certificate (default). - Enter
Nto require certificate validation.
- Enter
- Encrypt connection:
1– Mandatory (default)2– Optional3– Strict
SQL Server in Docker
If SQL Server runs in Docker, see the Docker Hub page for SqlBak Agent examples. It includes Docker Compose examples and notes about shared volumes required for SQL Server physical backups:
https://hub.docker.com/r/pranasnet/sqlbak-agent
Advanced settings
- Connection timeout (sec):
Time in seconds to wait for the connection to establish. Default:15 - Command timeout (sec):
Time in seconds to wait for SQL commands to complete. Default:30
Important
During installation, SqlBak creates a user group called sqlbak and adds the mssql user (the user under which SQL Server runs) into this group.
However, Linux processes determine the groups a user belongs to only once at process startup. Because of this, after installing SqlBak you must restart the SQL Server once so that it picks up the required permissions.
Do this with the following command:
sudo systemctl restart mssql-server